หลังจากที่เราเรียนรู้ Vector Embeddings ในภาคทฤษฎีกันแล้ว เมื่อเข้าถึงภาคปฏิบัติก็เป็นเรื่องง่ายเลยครับ ในบทความนี้เราจะมาลองลงมือใช้ APIs ต่าง ๆ ของ Google Cloud โดยมีการเขียนโค้ดบน Colab Enterprise จากหน้า BigQuery กันเลย!
Text Embeddings
เรามาเริ่มทำการสร้าง Text Embeddings กับข้อมูล Stackoverflow Dataset กันก่อน ซึ่งจะอยู่ในรูปแบบ Public Dataset บน BigQuery ครับ
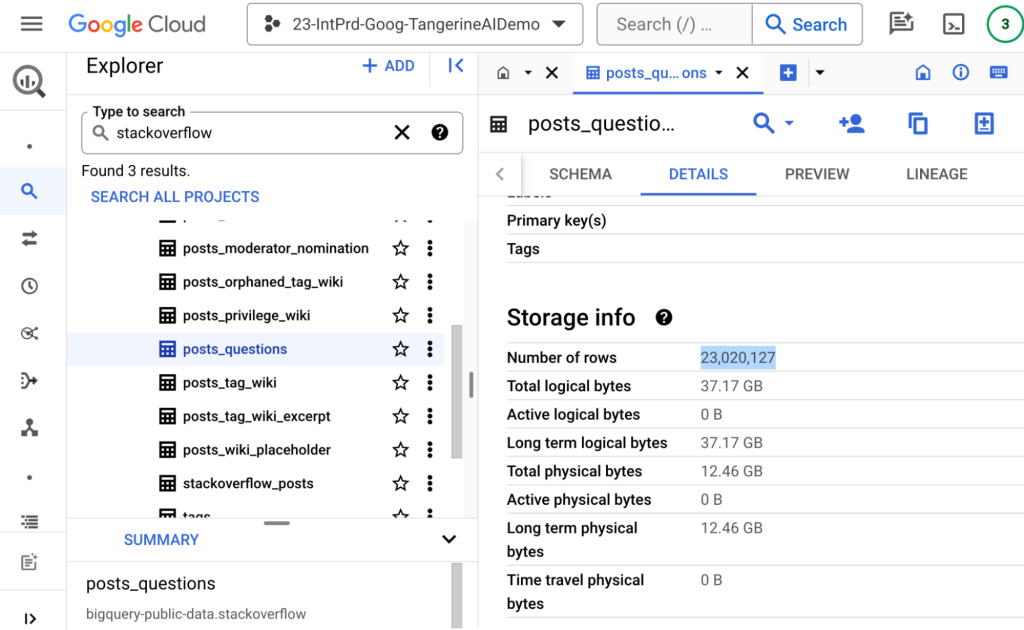
โดย Table ID ชุดนี้ คือ bigquery-public-data.stackoverflow.posts_questions ขนาด ณ เดือนกุมภาพันธ์ 2024 มีประมาณ 23 ล้านแถวครับ
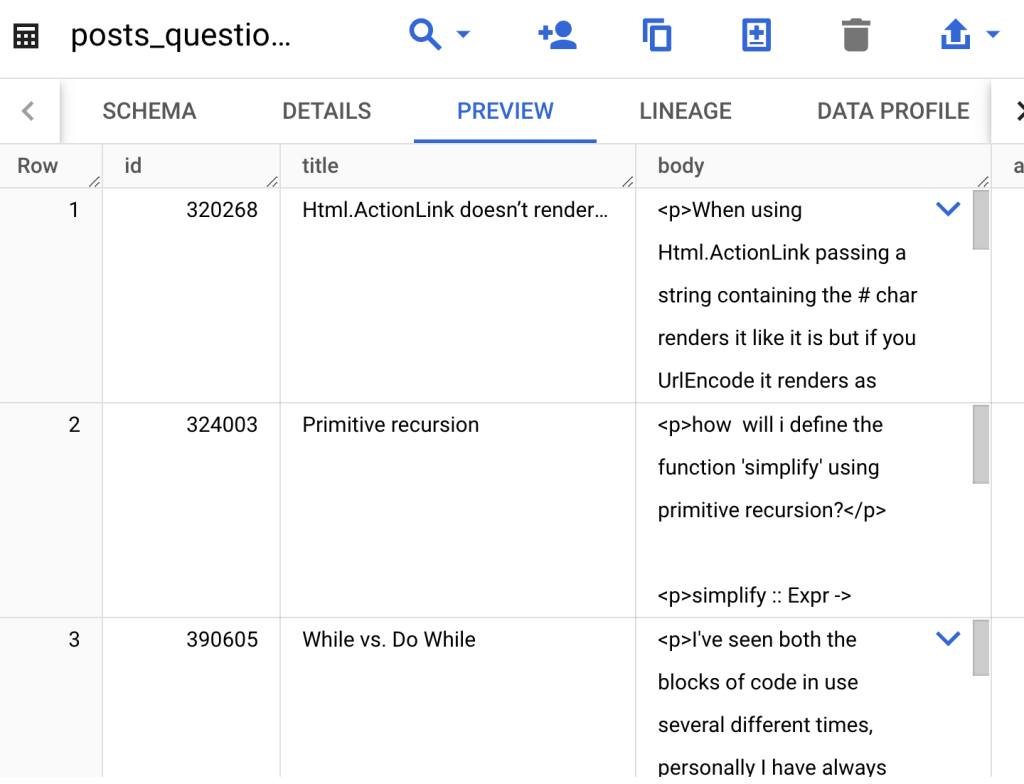
เมื่อลอง Preview ดู เราจะเห็น Column title จะมีหัวข้อที่พอจะให้เราไป Embeddings ได้ครับ เราจะดึงข้อมูลเหล่านี้ด้วย Python บน Colab Enterprise กัน
ในบทความนี้ผมอาจจะไม่ได้ลงรายละเอียดของ Colab บน BigQuery มากนัก เข้าใจว่าผู้อ่านน่าจะได้ลองเล่นตามบทความก่อนหน้ากันแล้ว หากท่านใดยังไม่เคยเล่น Colab บน BigQuery แนะนำให้ท่านอ่าน blog นี้เพื่อทำความเข้าใจก่อนครับ

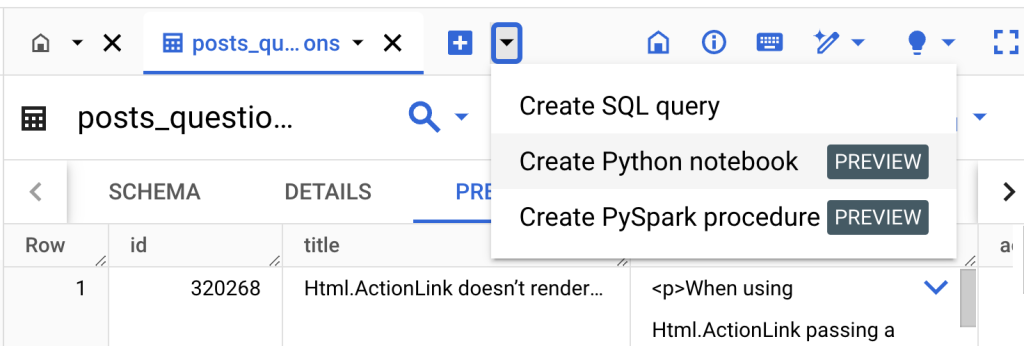
ที่หน้า BigQuery กดเครื่องหมาย + แล้วเลือก Create Python notebook ครับ
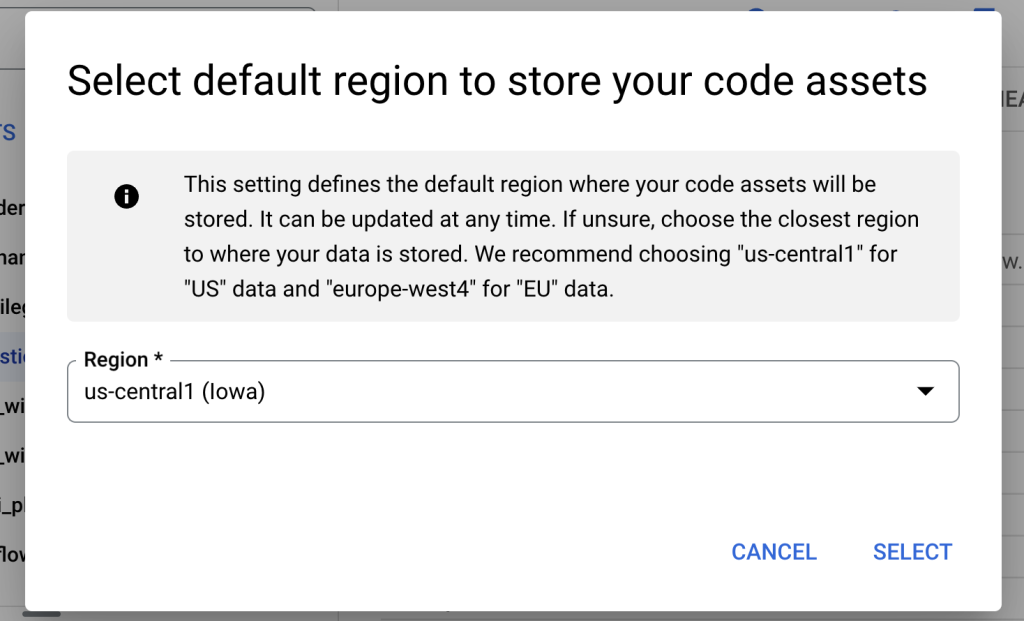
เลือก Region เป็น us-central1 ก็ได้ครับ จะได้อยู่ใกล้ ๆ กับ Public Dataset ที่มี Region เป็น US
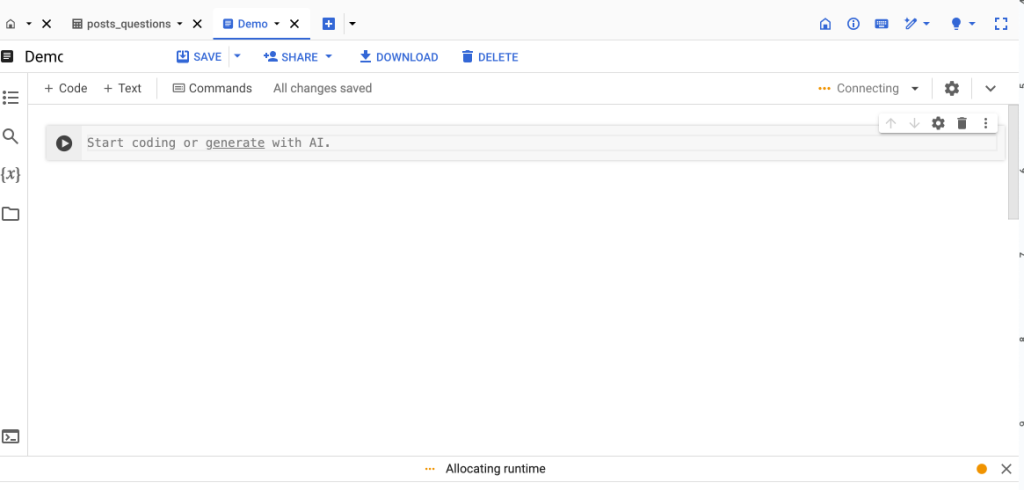
เตรียมพื้นที่และ Connect Runtime ด้านขวาบนให้เรียบร้อย
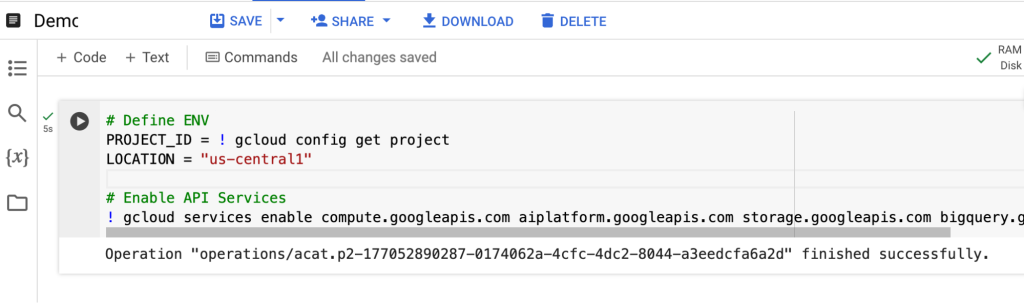
จากนั้นกำหนด PROJECT_ID และ Enable Services ต่าง ๆ ที่จำเป็น เช่น BigQuery และ Vertex AI
# Define ENV
PROJECT_ID = "tangerine-ai-demo"
LOCATION = "us-central1"

# Enable API Services
! gcloud services enable compute.googleapis.com aiplatform.googleapis.com storage.googleapis.com bigquery.googleapis.com --project {PROJECT_ID}
เราจะใช้ Query ID และ Title ของ Table นี้ โดยใช้ BigQuery Magic Command เพื่อเก็บผลลัพธ์จาก SQL อยู่ใน Dataframe ชื่อ df ครับ
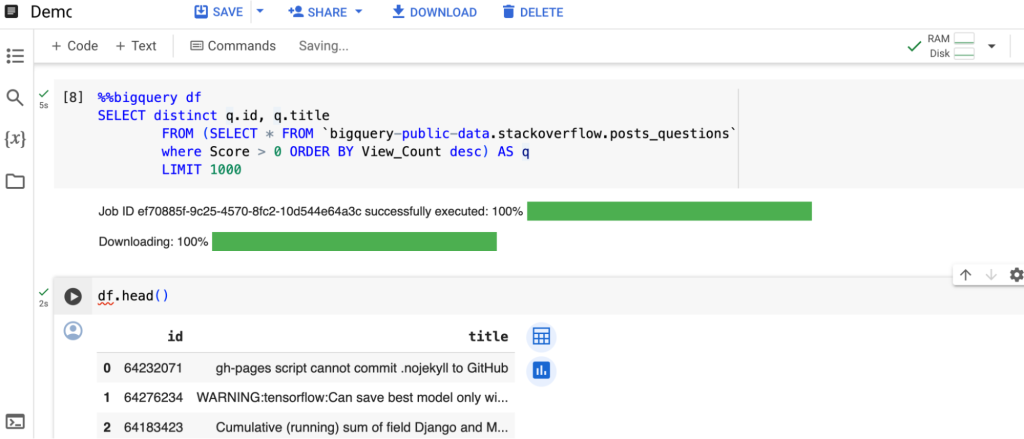
%%bigquery df
SELECT distinct q.id, q.title
       FROM (SELECT * FROM
`bigquery-public-data.stackoverflow.posts_questions`
       where Score > 0 ORDER BY View_Count desc) AS q
       LIMIT 1000
ถัดไปเราจะดูในส่วน Text Embedding Model บน Vertex AI Model Garden กัน ลองเข้าไปที่ Console ตามลิงก์นี้ได้ครับ
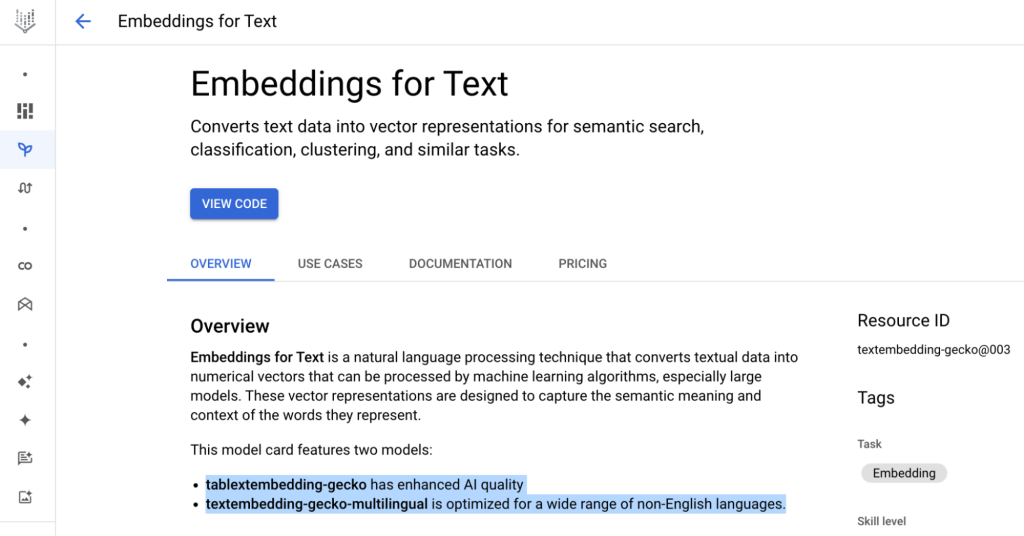
เราจะเห็นว่า Embeddings for Text มีอยู่ 2 Models ด้วยกัน
- Textembedding-gecko : ตัวที่ใช้ Embed ครับตอนนี้ถึงเวอร์ชัน 003 จะใช้ในตัวอย่างนี้ครับ
- Textembedding-gecko-multilingua : เหมาะสำหรับ Text Embed ที่ไม่ใช่แค่ภาษาอังกฤษ ถ้าเราใช้ภาษาไทยจะแนะนำใช้ตัวนี้ครับ
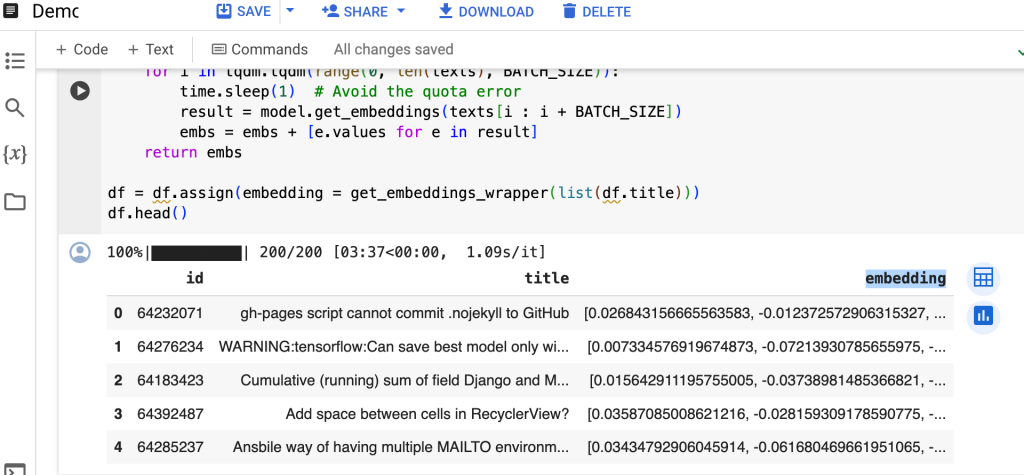
ประกาศตัวแปร Model โดยเรียกใช้ TextEmbeddingModel เวอร์ชันล่าสุด textembedding-gecko@003 แล้วทำการสร้าง Column ใหม่ชื่อ Embedding เรียก function get_embeddings_wrapper สำหรับ Embed Column title เป็น Vector ครับ เมื่อรันเสร็จจะเห็นผลลัพธ์เป็น Column ชื่อ embedding
import vertexai, time, tqdm
from vertexai.language_models import TextEmbeddingModel
vertexai.init(project=PROJECT_ID, location=LOCATION)
model = TextEmbeddingModel.from_pretrained("textembedding-gecko@003")
def get_embeddings_wrapper(texts):
BATCH_SIZE = 5
embs = []
for i in tqdm.tqdm(range(0, len(texts), BATCH_SIZE)) :
time.sleep(1) # Avoid the quota error
result = model.get_embeddings(texts[i : i + BATCH_SIZE])
embs = embs + [e.values for e in result]
return embs
df = df.assign(embedding = get_embeddings_wrapper(list(df.title)))
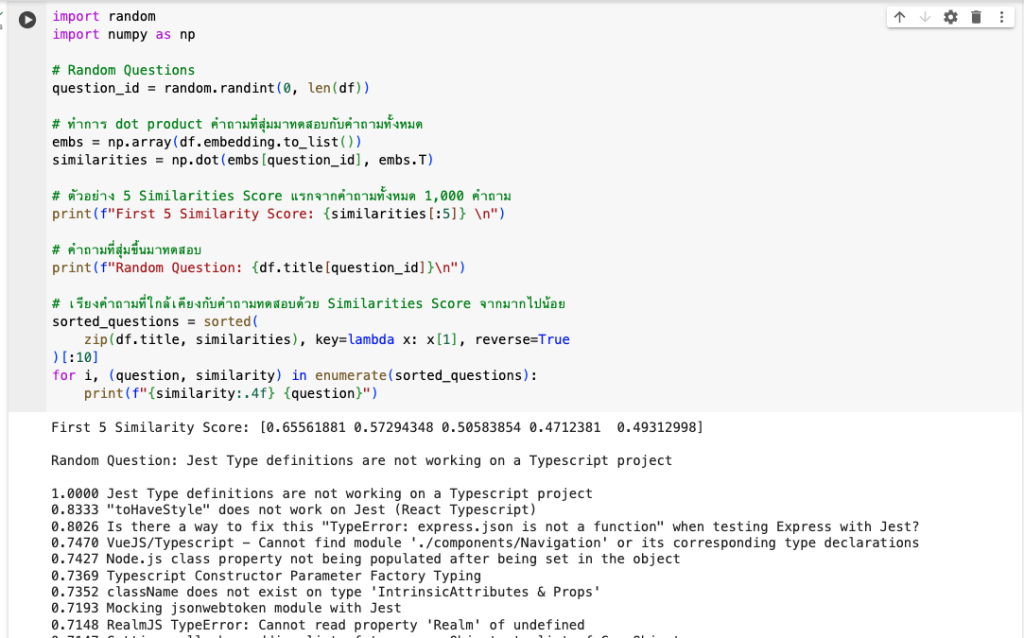
df.head()จริง ๆ หลังจากเราเรียก Method model.get_embeddings ก็เรียกว่าเราทำการ Embeddings ไปแล้วครับ การเปลี่ยนเป็น Vector ด้วย API นี้เป็นเรื่องง่าย แต่การนำไปใช้ประโยชน์ต่อเราต้องทำการหา Similarity Scores ดังที่อธิบายไปในบทความภาคทฤษฎีครับ ซึ่งถ้าใช้ Embedding ตัว textembedding-gecko แนะนำให้ใช้วิธีการหาความคล้ายคลึงกันด้วย Inner Product ครับ
import random
import numpy as np

# Random Questions
question_id = random.randint(0, len(df))

# ทำการ dot product คำถามที่สุ่มมาทดสอบกับคำถามทั้งหมด
embs = np.array(df.embedding.to_list())
similarities = np.dot(embs[question_id], embs.T)

# ตัวอย่าง 5 Similarities Score แรกจากคำถามทั้งหมด 1,000 คำถาม
print(f"First 5 Similarity Score: {similarities[:5]} \n")

# คำถามที่สุ่มขึ้นมาทดสอบ
print(f"Random Question: {df.title[question_id]}\n")

# เรียงคำถามที่ใกล้เคียงกับคำถามทดสอบด้วย Similarities Score จากมากไปน้อย
sorted_questions = sorted(
      zip(df.title, similarities), key=lambda x: x[1], reverse=True
)[:10]
for i, (question, similarity) in enumerate(sorted_questions):
      print(f"{similarity:.4f} {question}")
หลังจาก Inner Product และจัดเรียงคำถามตาม Similarities Score เราก็จะเห็นคำถามที่มี Vector ใกล้เคียงกันครับ มาถึงตรงนี้ก็เหมือนเราทำระบบ Semantic Search ด้วย Text ง่าย ๆ ไปแล้วในตัว
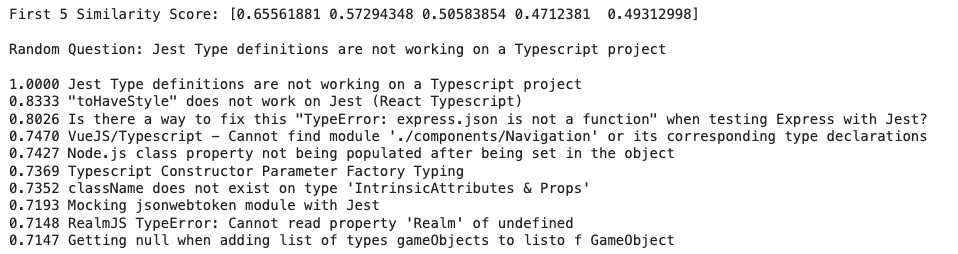
ทีนี้สิ่งที่เราทำอยู่มีหนึ่งข้อสังเกตครับ คือเรากำลังนำคำถามหรือ Query ตัวอย่างไป Search กับ 1,000 คำถามที่เรา Limit มาจาก BigQuery แล้วถ้าเราไม่ได้ Limit แต่ใช้คำถามทั้งหมดกว่า 23 ล้านคำถามมา Dot Product กับ Query ที่เราค้นหาทุกครั้ง และยังต้อง Sort เพื่อหา Similarity Score ที่สูงที่สุดอีก เราจะใช้ Resources มากมาย และกินเวลาโหลดแต่ละครั้งนานแค่ไหน นี่จึงเป็นเหตุผลที่เราใช้ Vector Search ร่วมด้วยครับ
Vector Search
Vector Search จะช่วย Index Vector ที่เรา Embeddings ให้ แล้วช่วยให้เรา Search คำตอบได้เร็วขึ้นถึงระดับ Millisecond โดยจะมีขั้นตอนดังนี้ครับ
- Dump Embeddings ลงเป็นไฟล์ JSON
- นำไฟล์ JSON ไปวางบน Cloud Storage
- โหลด Index เข้า Vector Search
- สร้าง API Endpoints ของ Vector Search
- Deploy Index เข้า API Endpoints ตัวนั้น
เริ่มกันที่สร้าง JSON File กันครับ
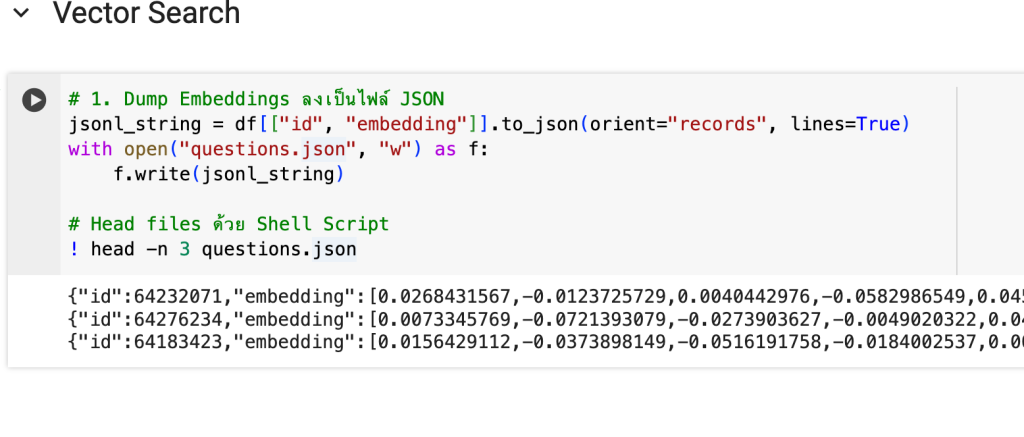
# 1. Dump Embeddings ลงเป็นไฟล์ JSON
jsonl_string = df[["id", "embedding"]].to_json(orient="records""gs://{{your gcs path}}", lines=True)
with open("questions.json", "w") as f:
   f.write(jsonl_string)

# Head files ด้วย Shell Script
! head -n 3 questions.json
จากนั้นนำไฟล์ questions.json ไปวางบน GCS Path ที่กำหนดครับ
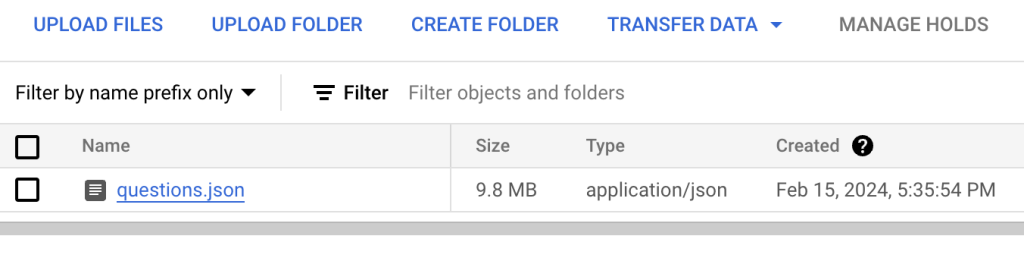
# 2. นำไฟล์ JSON ไปวางบน Cloud Storage
BUCKET_URI = f"gs://{{your gcs path}}"
! gsutil cp questions.json {BUCKET_URI}
จากนั้นโหลด Index เข้าไปใน Vector Search จะใช้เวลานิดนึงครับ
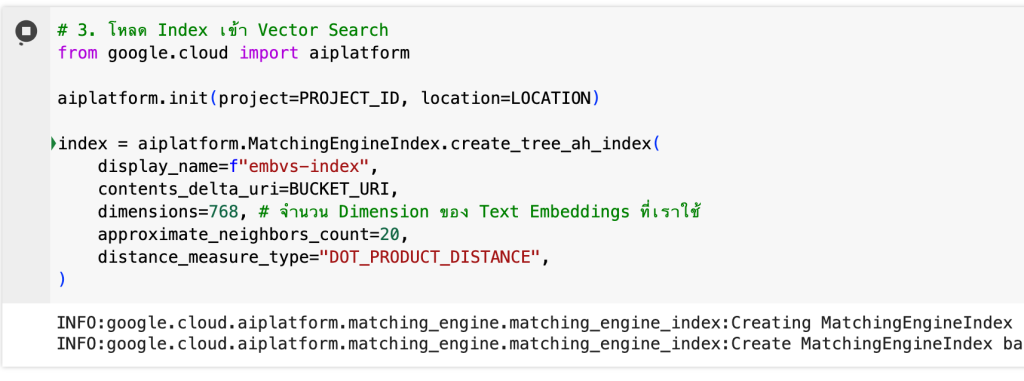
# 3. โหลด Index เข้า Vector Search
from google.cloud import aiplatform
aiplatform.init(project=PROJECT_ID, location=LOCATION)
index = aiplatform.MatchingEngineIndex.create_tree_ah_index(
display_name=f"embvs-index",
contents_delta_uri=BUCKET_URI,
dimensions=768, # จำนวน Dimension ของ Text Embeddings ที่เราใช้
approximate_neighbors_count=20,
distance_measure_type="DOT_PRODUCT_DISTANCE",
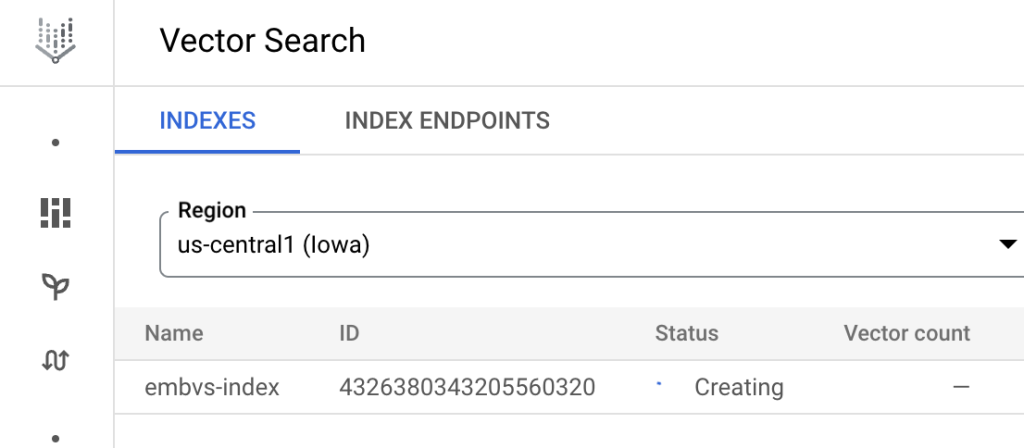
)ถ้าเข้าไปที่ Vector Search ใน Tab INDEXES จะเห็นว่ากำลังสร้าง Index อยู่ครับ

ระหว่างรอเราสร้าง Endpoints ทิ้งไว้ได้เลยครับ พอ Index สร้างเสร็จ ค่อย Deploy Index เข้า Endpoints
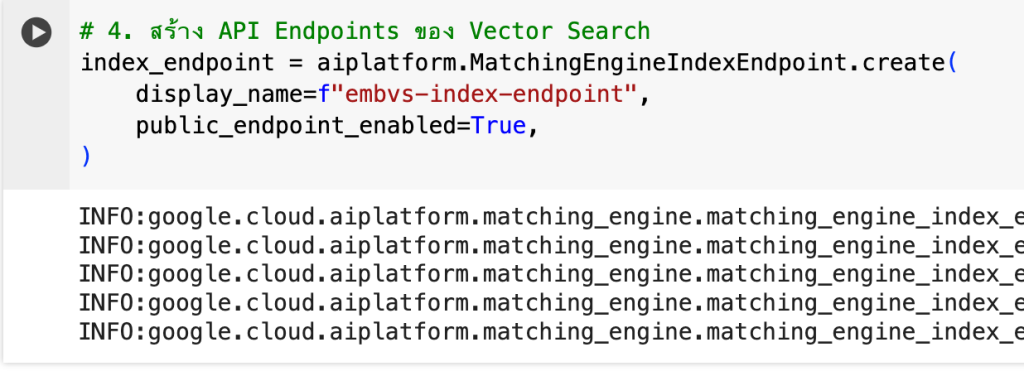
# 4. สร้าง API Endpoints ของ Vector Search
index_endpoint = aiplatform.MatchingEngineIndexEndpoint.create(
   display_name=f"embvs-index-endpoint",
   public_endpoint_enabled=True,
)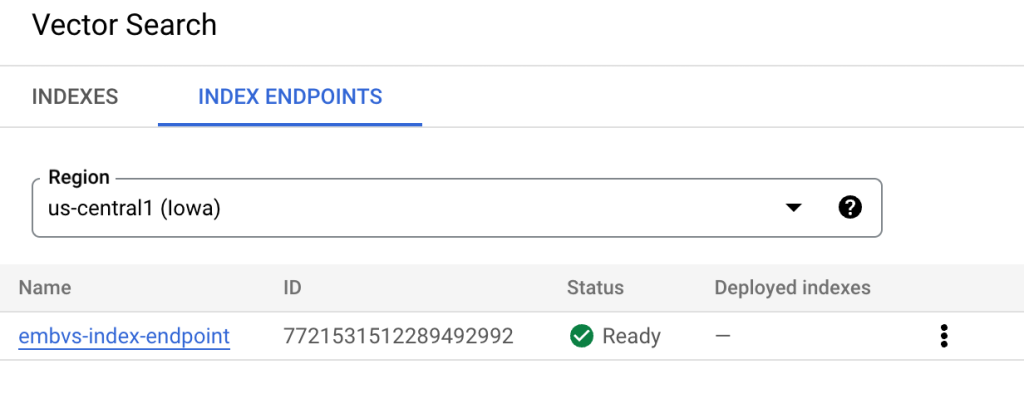
เมื่อ Index พร้อมแล้วสามารถเขียน Python Deploy หรือกด DEPLOY จากหน้า UI ได้เลยครับ
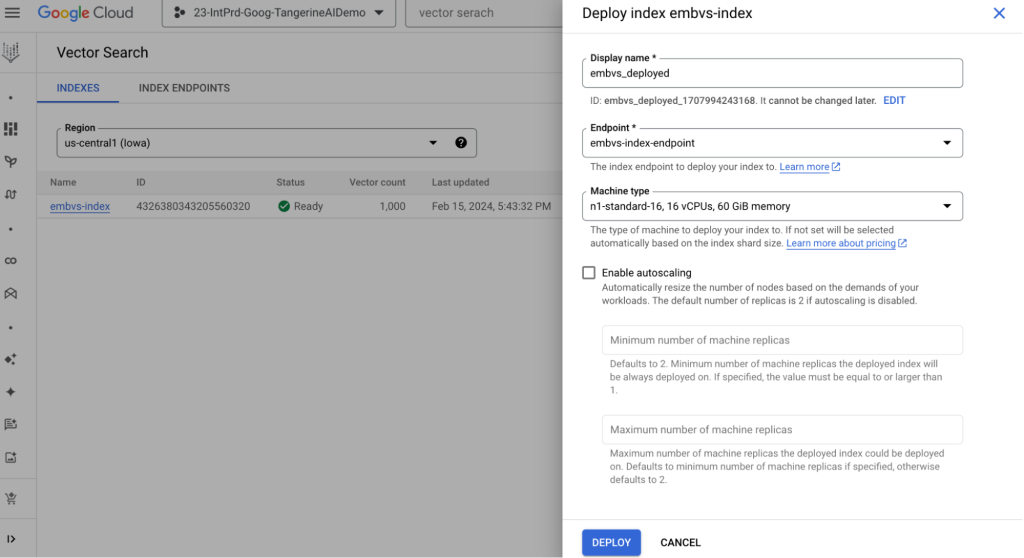
หรือเขียน Python แบบนี้ครับ

# 5. Deploy Index เข้า API Endpoints ตัวนั้น
index_endpoint.deploy_index(index=index,
deployed_index_id="embvs_deployed")
หลังจากรอ Vector Search ให้ทำการ Deploy สร้าง VM ต่าง ๆ มารับโหลดในการ Query ของเราครับ สัก 20 นาที เป็นอันเสร็จสิ้นการทำ Indexing & Deploy แล้วมาลอง Query กันครับ
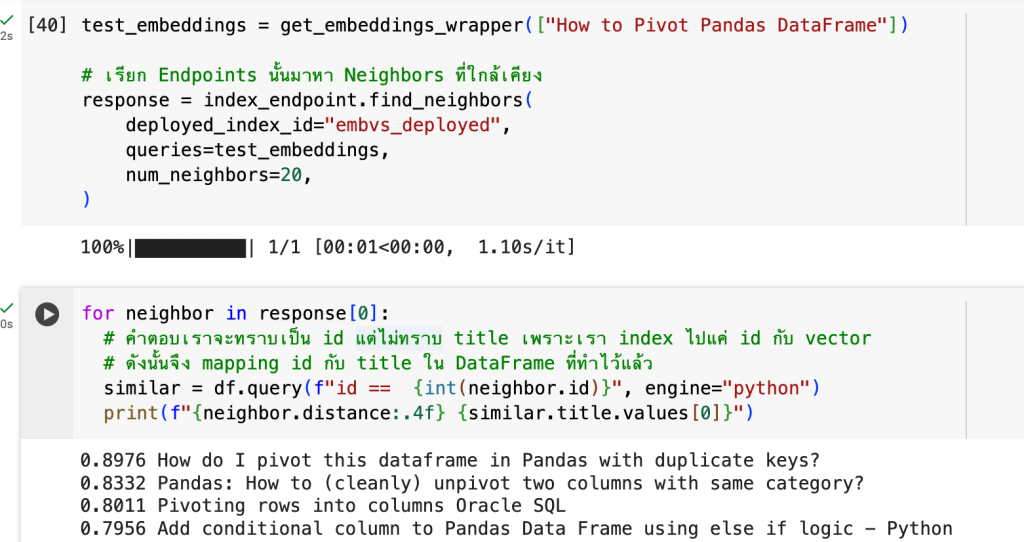
test_embeddings = get_embeddings_wrapper(["How to Pivot Pandas DataFrame"])

# เรียก Endpoints นั้นมาหา Neighbors ที่ใกล้เคียง
response = index_endpoint.find_neighbors(
   deployed_index_id="embvs_deployed",
   queries=test_embeddings,
   num_neighbors=20,
)
for neighbor in response[0]:
# คำตอบเราจะทราบเป็น id แต่ไม่ทราบ title เพราะเรา index ไปแค่ id กับ vector
# ดังนั้นจึง mapping id กับ title ใน DataFrame ที่ทำไว้แล้ว
similar = df.query(f"id == {int(neighbor.id)}", engine="python")
print(f"{neighbor.distance:.4f} {similar.title.values[0]}")จากตัวอย่างการ Query ข้างต้นจะเห็นได้ว่า Query ที่เราถามไปต้องทำการ Embeddings ก่อนเป็น Vector แล้วจึง Pass เป็น Parameter Queries ส่งไปครับ จากนั้นจึง For Loop แสดงผลลัพธ์เป็น ID ที่เกี่ยวข้องออกมา เพื่อให้อยู่ในรูปแบบที่นำไปใช้ต่อได้ จึงทำการ Mapping กับ df ที่เรามี ID กับ Title ที่ทำตั้งแต่หัวข้อ Text Embeddings มาใช้ต่อในการแสดงผลลัพธ์นี้ครับ
นี่คือทั้งหมดของการทำ Vector Search ครับ ซึ่งอาจจะดูซับซ้อนแต่ความจริงแล้วไม่ยากเลยหากเราเข้าใจ แต่ยังไม่จบเพียงเท่านี้ครับ หากเราสังเกตกระบวนการ Search นี้จะเป็น Query & Answers ครับ คือเราได้คู่ของคำถามและคำตอบ แต่ใน Use-cases ต่าง ๆ บางครั้งเราก็ต้องการสรุปจากผลลัพธ์เหล่านี้ด้วย Gen AI ใช่ไหมครับ เราจึงสามารถต่อยอด Search รูปแบบนี้กับ LLMs ได้ออกมาเป็นเทคนิค RAG ครับ
Conclusion
ผมเชื่อว่าทุกท่านน่าจะเกิดไอเดียในการใช้ Vector Search กันแล้ว และน่าจะต่อยอดได้หลากหลาย Business Use-cases อย่างที่เกริ่นไว้ข้างต้นว่า โลกของ Gen AI ยังไม่จบเท่านี้ เรายังสามารถต่อยอดเป็นการทำ RAG ได้อีก ซึ่งผมขออนุญาตลงรายละเอียดในบทความถัดไปใน “สถาปัตยกรรม RAG กับ
Vertex AI Search & Conversation” เปรียบเสมือนภาคเสริมของ Vector Embeddings แล้วพบกันบทความหน้าครับ